4slicesSwiss cheese (or your favourite cheese; optional)
4buns
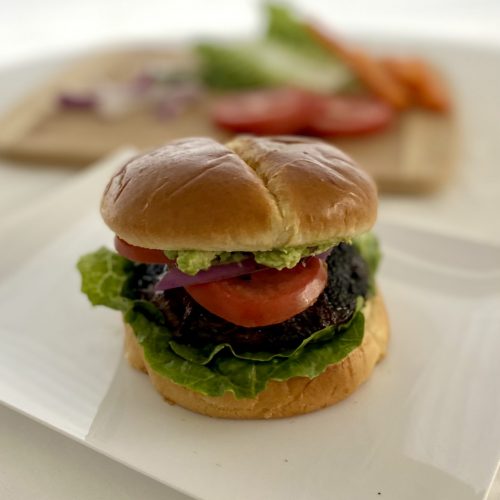
Your favourite burger toppings - lettuce, tomatoes, onions, avocado, relish, etc.
Instructions
Gently wipe the mushrooms with a mushroom brush. Trim off the stems and save these for a soup, salad or stir-fry. Place mushroom caps in a shallow dish with the gills facing up.
Mix the olive oil, soy sauce, apple cider vinegar, sugar and spices in a small bowl to make a marinade.
Brush the marinade along the mushroom gills, and then pour some of the marinade into the mushroom caps. Turn the mushrooms over and pour the remaining marinade on top of the mushrooms. Brush the marinade on mushroom tops.
Allow mushrooms to marinade 10 minutes. Turn mushrooms over so that gills are facing up again. Use a spoon to scoop the marinade and pour marinade into the mushrooms. Let mushrooms marinade for at least another 20 minutes.
Cook mushrooms on a heated grill for a few minutes on each side. Or pan fry on medium heat.
Enjoy your burger with your favourite buns and toppings!
Notes
This is a modified version of a recipe created by BudgetBytes.
Finely mince the shrimp to create a paste. (Fold the minced shrimp over and continue to mince. Repeat this about 10 times until you get a paste. Or you can use a food processor.)
In a bowl, add shrimp paste, chopped green onions, sesame oil, salt and cornstarch. Mix well.
Cut each green pepper into quarters (or more pieces, if pepper is large). Remove seeds. To help peppers lie flat when cooking, trim off the curved ends. (Save these for a stir-fry or salad.)
Dust each piece of green pepper with cornstarch. You can sprinkle the cornstarch into the pepper with a spoon, and then tap the green pepper upside down to remove any excess. Chef Mah's tip (aka my Dad): This helps the shrimp filling to stick to the green pepper.
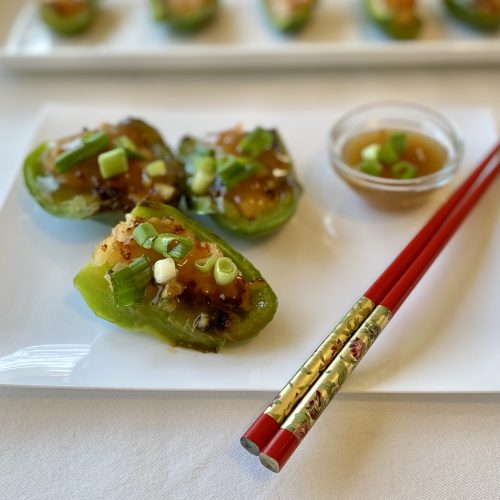
Spoon in the shrimp filling and press firmly into the pepper.
Heat oil in a skillet over medium-high heat. Cook peppers, stuffing side down for a few minutes until browned. Turn peppers over and cook for another few minutes.
Add 2 T water and steam for a couple of minutes until peppers are tender. Remove lid and continue cooking until all water has evaporated.
To make the sauce: Add broth (or water), oyster sauce and soy sauce in a small saucepan. Bring to gentle boil and reduce to simmer. In a small bowl, mix cornstarch and water to create a slurry. Gradually whisk slurry into the sauce until it thickens.
Garnish stuffed peppers with remaining green onions. Serve with sauce. Enjoy!
Notes
Keyword Chinese dim sum, Chinese food,, dim sum, dim sum recipes, green peppers, shrim stuffed peppers, shrimp, shrimp stuffed peppers, stuffed peppers
This salad is just bursting with flavours – earthy beets, fresh citrus and peppery arugula!The beets give the quinoa a beautiful red hue! Add feta cheese for an extra hint of creaminess.
Ingredients
1 cup quinoa
2 cups water
2 cups arugula
4-5 cooked beets (about 1 lb)*
1 orange
Optional: feta cheese
Dressing
2 T olive oil
2 T red or white wine vinegar
1/2 tsp sugar
salt and pepper to taste
*You can roast, steam or boil beets. Or use packaged, pre-cooked beets.
Instructions
Rinse quinoa. Place quinoa and water in a small saucepan on high heat. Bring to boil, then reduce heat to medium-low and cover. Cook for about 10-12 minutes or until the liquid is absorbed. Fluff with a fork and allow to cool.
In a small bowl, whisk together olive oil, vinegar, sugar, salt and pepper.
Peel and dice beets. Peel orange and remove white pith. Cut each orange segment into thirds or quarters.
In a large serving bowl, combine quinoa and arugula. Gently mix in beets and orange segments. Add dressing and toss lightly. Optional: Sprinkle feta cheese over salad before serving.
You’ll love these delicious dumplings made with ground pork and shrimp. Feel free to substitute the ground pork with any other meat and / or swap the shrimp for meat. Enjoy!
Ingredients:
3/4 lb ground pork (or any other ground meat)
8-10 raw, peeled shrimp, diced finely
2 cups spinach or other leafy green veggie, minced
3 Tbsp minced fresh ginger
2 cloves garlic, minced
3 Tbsp sesame oil
3 Tbsp soy sauce
1/4 tsp pepper
30-40 dumpling wrappers
oil for cooking
hoisin sauce, soy sauce, chili sauce, or other dipping sauce
Directions:
Mix all of the ingredients (except the dumpling wrappers, oil and dipping sauce) into a big bowl to make the dumpling filling.
Keep dumpling wrappers covered with a damp towel to prevent the edges from drying out.
Place about 1 Tbsp of the filling in the centre of a dumpling wrapper. (Don’t overfill the dumplings.)
Dampen the edges of the wrapper with water.
Fold the wrapper in half. Start at the middle and pleat half the dumpling. Turn the wrapper around and repeat the pleating. (See video below for the pleating technique.)
Heat oil in a large pan on medium to high heat. Fry dumplings for a few minutes until they golden brown on the bottom. Flip the dumplings over and fry for another minute.
Pour 1/4 to 1/3 cup of water into the pan. Cover the pan with a lid and reduce heat to medium-low. Steam the dumplings this way until almost all of the water has evaporated.
Remove the lid and allow the dumplings to continue cooking until all of the water has evaporated, and the dumplings are dry and crispy on the bottom.
Serve with your favourite dipping sauce – hoisin sauce, soy sauce or chili sauce.
This easy and delicious Apple Strudel is made with flaky phyllo pastry.
The trick to working with phyllo pastry is to brush each layer with melted butter (or oil). If the phyllo pastry happens to tear, just press it back together.
3 large apples, peeled, cored and sliced 1/8-inch thick (Royal Gala, Macintosh, or Granny Smith)
1/3 cup granulated sugar
1/2 teaspoon cinnamon
1/2 cup walnuts, coarsely chopped
3 T flour
8 sheets phyllo dough (9 x 14-inch sheets) , thawed
1/2 cup unsalted butter, melted
2 T turbinado sugar (or granulated sugar)
Directions
Preheat oven to 350°F. In a large bowl, add apples. Sprinkle in 1/3 cup sugar and toss to combine.
Mix in cinnamon and walnuts. Toss to combine. Add in flour and mix everything together with a spoon.
Line a baking sheet with parchment paper. Place 1 sheet of phyllo on the parchment paper. Brush lightly with some of the melted butter.
Keep remaining phyllo sheets covered with a damp towel to prevent them from drying out. Add another phyllo sheet, brushing with melted butter until you have a total of 8 phyllo sheets.
Spread apple mixture over the middle of the phyllo (about 3 inches wide), leaving about 2 inches along each short end of the phyllo sheets.
Fold the short edges of the phyllo sheets over the filling. Roll up the long ends of the phyllo sheets to make the strudel shape.
Brush with remaining melted butter and sprinkle with turbinado sugar.
Cut 6-8 diagonal slits in top of strudel. This will make it easier to slice the strudel after baking.
Bake in the middle rack of the oven, until golden brown, about 35-40 minutes. Cool on a wire rack.
Serve warm and enjoy! Perfect for afternoon tea or dessert!
Husband: I think we’ve OD’d on Brussels sprouts these past few months.
Me: No such thing! And I proceed to serve up a 15″ x 21″ tray of roasted Brussels sprouts! Haha!
Ok, to be honest, we HAVE been eating A LOT of Brussels sprouts, pretty much since Thanksgiving in October. Because I make a big batch all at once, we’re eating them a few times each week.
But can you blame me?
These little green gems are nutrition powerhouses – packed with fibre, beta-carotene, vitamin C, folate, potassium and even vitamin K!
Plus they’re sooo easy to make! Try it and let me know what you think!
Roasted Brussels Sprouts Recipe
1. Cut Brussels sprouts in half or quarters.
2. In a large bowl, toss Brussels sprouts with olive oil, sea salt and pepper.
3. Place Brussels sprouts on a baking sheet. Bake at 400F for about 30 minutes or until lightly charred around the edges. (I bake them just a bit longer because I like the loose leaves to get crispy.) Enjoy!
It’s apple season and the perfect time to make an apple pie!
Last week, I was invited to a virtual pie making class with the University of Toronto – University College Alumni and Chef Umie from Le Dolci bakery. What fun! Here’s their recipe for the Perfect Apple Pie, plus some tips and tricks to know before you get started.
Tips and Tricks
Keep everything cold, including your hands.
Use a cheese grater to cut the cold butter into pieces. (Remember tip #1 above. Your warm hands may accidentally soften the butter.)
Avoid overworking the dough. Friction is your number one enemy. The less you touch the dough, the better. If you re-roll dough too many times, it becomes tough, and who wants a tough pie crust, right?
Use a combination of shortening and butter for the flakiest crust ever.
Bake your pie in simple aluminum pie plate since it conducts heat the best. Ceramic pie plates are the prettiest, but they’re thick and take a long time to heat as well as a long time to cool – this could dry out your pie.
Choose tart apples such as Spy, Gala, Russet, Cortland or Macintosh.
When baking, it’s most precise to measure out ingredients by weight. A simple kitchen scale will do the job! I’ve included the approximate equivalent cup measures.
Pie Crust
Ingredients
375 g all-purpose flour (about 3 cups)
160 g cold butter (about 2/3 cup), cut into 1/2 inch pieces (or grated with a cheese grater)
125 g vegetable shortening ( about 2/3 cup), cut into 1/2 inch pieces
100 g cold water(about 6-7 Tbsp), (keep it in the fridge until you need it so that it stays cold)
5 g salt (about 1 tsp)
15 g brown sugar (optional)
Directions
In a medium sized bowl, combine the flour and salt. Add the shortening and rub into flour.
Grate the cold butter into the flour. Rub the butter into the flour until it looks like pea-sized crumbs.
Sprinkle cold water over the flour mixture and gently stir until it just comes together and the dough colour is creamy, not white. Always use less water instead of more. Remember, friction is your number one enemy.
Transfer dough to a floured counter, shape / squish the dough into a thick disc. Avoid kneading the dough. Cover dough tightly with plastic wrap (in a “T”-shape, i.e. fold the plastic wrap one way around the dough, and then fold another piece of plastic wrap in the other direction around the dough). Allow dough to rest in fridge for at least 15-20 minutes before rolling. While the dough is resting, prepare the apple pie filling.
Roll out the dough on floured counter. Flour your rolling pin. Roll any dough scraps under a piece of fresh dough to prevent overworking the dough. Roll dough to about 2-3 mm thickness. Cut out about half of the dough to form the bottom pie crust. Be sure to allow about 1/2 inch extra dough around circumference of the pie plate.
Roll the crust onto the rolling pin and carefully unroll it onto the pie plate.
Gently press the edges of the pie crust into the pie plate.
Roll out the remaining dough into about 10 thin ribbons.
Keep your rolling pin and surface well floured!
Apple Pie Filling
Ingredients
5-6 cups tart apples, peeled and cut into 1/4 inch pieces (about 4 apples)
1/2 cup sugar
2-3 Tbsp cornstarch
2 tsp fresh lemon juice
1 tsp ground cinnamon
1/2 tsp ground nutmeg
2 Tbsp butter (optional for dotting on top of the filling before clsoing the pie)
1 egg beaten with 1 Tbsp cold water (egg wash)
1 Tbsp sugar (for sprinkling)
Directions
In a large bowl, mix together apples, sugar, cornstarch, lemon, cinnamon and nutmeg.
Pour into the crust, leaving room around the edges to seal. Add in butter in small chunks (optional).
Create a lattice pattern with the ribbons of dough.
Brush the lattice with egg wash just before baking and sprinkle with sugar (optional).
Bake the pie or freeze to bake it another day.
If baking immediately: Bake in a 375 F preheated oven for 20 minutes, then reduce heat to 350 F and bake for an additional 40 minutes or until the pastry is golden brown and the centre of the pie is bubbling.
If baking from frozen: Bake from frozen in a 375 F preheated oven for 30 minutes, then reduce heat to 350 F and bake for another 60 minutes.
The cinnamon and nutmeg are the stars in the apple filling!
Ready for the freezer! Can be baked from frozen.
My favourite way to enjoy apple pie is warm with a scoop of ice cream! How about you?
Celebrate Food Day Canada on August 1st with delicious, local peaches and nectarines! Prep time: 5 minutes
Peach & Tomato Summer Salad
Ingredients
2 peaches or nectarines (leave the skins on)
10 cherry / grape tomatoes or 1 small tomato
1 Tbsp balsamic vinegar
1 Tbsp olive oil
Salt / pepper to taste
Fresh basil leaves for garnish
Directions
Dice the peaches and have the cherry tomatoes. Toss gently with balsamic vinegar and olive oil. Add salt / pepper if desired. Garnish with fresh basil leaves.
Disclosure: This post was sponsored by the Registered Dietitians at the Canadian Sugar Institute, and I have received monetary compensation. As always, my own professional opinions and views are expressed.
I love food! And a big part of my job as a dietitian is to help Canadians love food too! I’m passionate about translating the complex science of nutrition into everyday healthy eating tips that make sense and are easy for people to follow. So when my dietitian colleagues at the Canadian Sugar Institute invited me to a hands-on cooking Sweet Spot Workshop with Chef Claire Tansey, I was excited to learn more!
Specifically, for the first time ever, there is a Daily Value for sugars, set at 100 grams. According to Health Canada, 100 grams isn’t meant to be the recommended amount of sugars to consume, but instead it’s an amount of sugars that is consistent with a healthy eating pattern. On food labels, the sugars content of the food will be listed in grams (g) and also as a percent of the Daily Value (% DV) (see below for the “NEW” image of the Nutrition Facts table).
Now remember that 100 grams is the total from all types of sugars:
naturally occurring sugars (like the sugars found in fruit, veggies and unsweetened milk products);
added sugars (like different sugars that are added when cooking or processing food); and
free sugars (these are added sugars plus sugars that are naturally found in honey, syrups, fruit juices and fruit juice concentrates).
Image source: Health Canada
Now, the food!
So what exactly does 100 grams of sugars look like when it comes to real food? That’s where the Sweet Spot Workshop comes in. Dietitians teamed up at the workshop to make a day’s menu of food – adding up to 100 grams of sugars, staying within the sodium and fat recommendations, and totalling no more than 2,000 calories (the average number of calories needed by an adult). So here’s what we made. All recipes were inspired by Claire’s latest cookbook Uncomplicated.
Breakfast
Instant Bircher Museli – made with oats, unsweetened apple juice, nuts and fresh pears and paired with a single serving of Greek yogurt – 28 g sugars
Lunch
Chilled Cucumber and Sesame Noodles with Tofu – made with soba noodles, maple syrup, sesame oil, cucumbers, tofu and edamame, served with sweet and sour bok choy – 7 g sugars
Snack
Assorted berries and cherries with a fruit / kale Greek yogurt smoothie – 29 g sugars
Dinner
Coconut Chicken Curry – made with chicken, coconut milk, ginger, curry paste, tomatoes and peas, served with steamed broccoli – 7 g sugars
Dessert
Plum-Almond Galette – made with fresh, local plums – 30 g sugars
The bottom line
You can definitely enjoy a variety of healthy meals with a small dessert AND stay within 100 grams of sugars for the day! Enjoy!